How to Import Excel to Snowflake


Excel is the default choice for business users. Snowflake is the default choice for data teams. Integrating the two should be simple.
Unfortunately, the reality is that most businesses end up with a complex mess of infrastructure, data pipelines, and manual processes to move data from Excel to Snowflake, or they simply rely on their already overloaded tech team to manually load the spreadsheet data for the business users.
"Seriously, it's this hard?!"
— Business Leaders Everywhere
Reseed was built to solve this problem. When you get Excel and Snowflake working well together, your business users move faster, your data team stays focused, and your infrastructure stays simple.
Compare Your Options
Most teams choose one of two approaches: direct CSV uploads or data pipelines. Both work, but they come with trade-offs. Here's how each compares to Reseed—a third option that eliminates the compromises.

Option 1: How to Upload Excel to Snowflake via Direct CSV Upload
Quick Summary:
- Those performing the upload will be trained, trusted Snowflake users (likely on the data team itself)
- Data quality or error feedback is not needed immediately
- If this is all you need, great!
Step-by-Step: How to Load Excel into Snowflake Using Direct CSV Upload
To upload Excel to Snowflake using this approach, you'll need to convert Excel files to CSV format first, then upload them directly to a Snowflake stage.
- Convert Excel to CSV: Users must manually save Excel files (.xlsx, .xls) as CSV format. For multi-worksheet Excel files, each worksheet needs to be saved as a separate CSV file.
- Create Snowflake Stage: A Snowflake administrator creates stages for data uploads. You can organize this in two ways:
- Dedicated stage per data source: Create separate stages for each data source:
stage_1/file.csvstage_2/file.csv- etc.
- Single stage with paths: Use one stage with different paths for each data source:
stage/path_1/file.csvstage/path_2/file.csv- etc.
- Configure Permissions: Set up role-based access controls so users can upload to the stage but can't access other stages or data. Note: Snowflake permissions are set at the stage level, not at the path level. If you need path-level access control, you'll need to use separate stages for each path.
- Upload CSV Files: Users upload CSV files directly to the Snowflake stage (or to the appropriate path if using a single stage with paths) using Snowflake's web interface or command-line tools.
- Load into Tables: Use COPY INTO commands or Snowflake's data loading features to move data from the stage into your target tables.
Considerations When Importing Excel Data into Snowflake This Way
| Option 1 Challenges | How Reseed Compares |
|---|---|
| CSV conversion required: Users must manually save Excel files as CSV. Multi-worksheet Excel files need to be split into separate CSV files, requiring training and creating opportunities for error. | Reseed lets you upload Excel files directly. Use CSV files if you want. |
| No data validation at upload: When you load data into Snowflake this way, invalid data, wrong formats, missing required fields, or schema mismatches aren't caught until downstream processes fail—often hours or days later. | Reseed provides immediate data quality validation. Errors are gathered into exportable reports so you can quickly fix scattered data issue on very large files. |
| Stage management overhead: Before business users can get started, sysadmins must create and maintain either a growing roster of stages (one per data source) or manage paths within stages, both requiring ongoing administration. | Reseed manages file access internally. New secure file paths or file patterns can be added quickly without Snowflake Admin intervention. |
| Snowflake Object Sprawl: Each stage needs proper role-based access controls. As your data sources and users expand, you can see Snowflake roles and stages expand, increasing the complexity of managing Snowflake roles, permissions, and security policies. | Reseed has a fixed footprint of 1 stage and 2 Snowflake roles (reseed_admin vs reseed_user). Reseed lets you distribute file loading without constant Snowflake object management and monitoring. |
| Burden the user or burden the data team: Business users must learn Snowflake concepts (stages, roles, permissions) just to upload data to Snowflake, or the central data team must act as a responsive support team. | Business users can upload directly to Snowflake using Reseed's user-friendly interface. No training on Snowflake concepts required. Data teams focus on higher-value work. |
Option 2: How to Import Excel Data into Snowflake Using a Data Pipeline
Quick Summary:
- You have dedicated on-prem infrastructure team that already manages the movement of data from on-prem to cloud locations
- The delays inherent in scheduled data movement processes are acceptable for your workflow
- You already have data transformation and data quality testing tools in place
- Business users don't need immediate feedback on data quality
- Your technical teams have the capacity to write new data quality tests, file movement scripts (both on-prem and in the cloud), and act as a data quality triage and support team.
- If you already have these teams and tools in place, great!
The data pipeline architecture may look something like this (simplified):
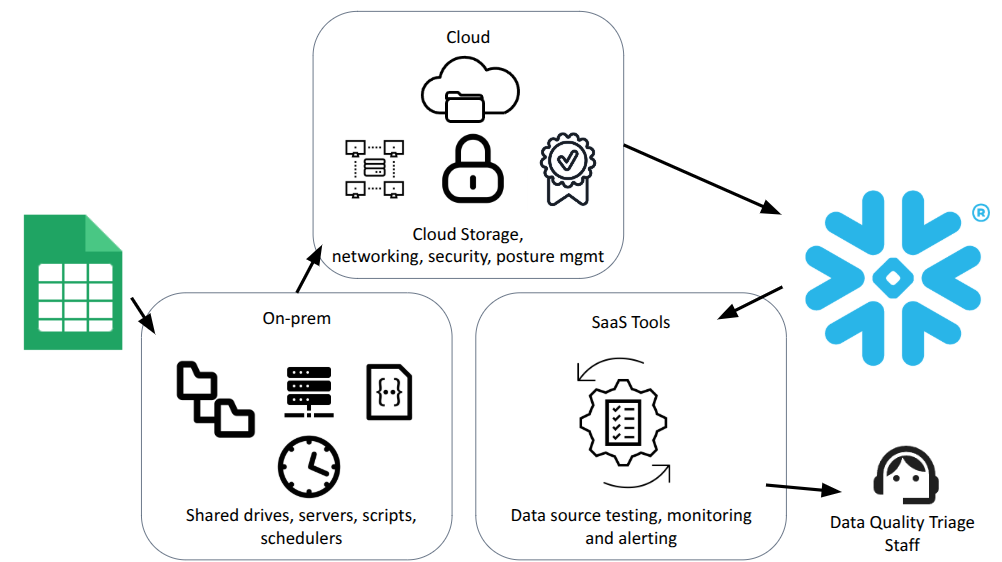
Step-by-Step: How to Load Excel into Snowflake via Data Pipeline
To import Excel data into Snowflake using a data pipeline approach, business users save Excel files to a shared location, then you'll set up an automated workflow that moves files from local storage to cloud storage, then into Snowflake.
- Set Up Shared Drive and Decide on CSV Conversion: Configure a network shared drive or file server where users can save files. This becomes the staging area for your Excel to Snowflake import process. You'll need to decide whether business users will convert Excel files to CSV themselves, or if your IT team will handle the conversion:
- If users convert to CSV: Business users save Excel files as CSV format and copy those CSV files to the shared drive location.
- If IT handles conversion: Business users copy Excel files directly to the shared drive, and your IT team writes a script to transform the Excel data (including selecting specific worksheets from the file) into CSV format.
- Create Monitoring or Scheduled Script: Develop a script (Python, PowerShell, or similar) that processes files from the shared drive. You can choose between two approaches:
- Monitoring script: The script continuously monitors the shared drive, sweeping the location every X minutes to detect new files and trigger the next step.
- Scheduled script: The script runs on a fixed schedule (e.g., daily, hourly) to process files that have been uploaded since the last run.
- Copy to Cloud Storage: The script copies Excel files to cloud storage like AWS S3, Azure Blob Storage, or Google Cloud Storage. This requires cloud credentials and network access.
- Configure Snowpipe or External Tables: Set up Snowflake's Snowpipe or external table integration to automatically detect and load files from cloud storage into Snowflake. This requires Snowflake admin access and proper configuration.
- Set Up Data Transformation: Use tools like dbt (data build tool) to transform the loaded data, apply business rules, and prepare it for analytics.
- Implement Data Quality Tests: Create data quality tests in dbt or similar tools to validate data after loading. These tests check for required fields, data types, ranges, and business rules.
- Monitor and Triage: Set up monitoring for test failures. When tests fail, the data team investigates, communicates with business owners, and coordinates fixes.
Architecture Overview for Importing Excel to Snowflake via Pipeline
This approach creates a multi-component architecture: Excel files → Shared Drive → Monitoring Script → Cloud Storage (S3) → Snowpipe/External Tables → Snowflake Tables → Data Transformation (dbt) → Data Quality Tests.
Considerations When Loading Excel into Snowflake This Way
| Option 2 Challenges | How Reseed Addresses This |
|---|---|
| Infrastructure sprawl: Requires shared drive infrastructure, monitoring scripts, cloud storage (S3), Snowpipe or external table setup, and data transformation tools (dbt). | Reseed eliminates infrastructure sprawl. No shared drives, scripts, cloud storage, or Snowpipe setup required. Everything runs inside Snowflake as a Native App. |
| Delays and bottlenecks: Files wait for scheduled upload jobs. If a job runs daily, a file uploaded Monday afternoon might not be processed until Tuesday. Each step adds latency when you import Excel data into Snowflake. | Reseed provides immediate processing. Valid data is available in Snowflake right away—no waiting for scheduled jobs or pipeline delays. |
| No immediate feedback: Users don't know if their file has issues until hours or days later, after the pipeline has run, tests have failed, triage has been done, and the data team has notified them of the failure. | Reseed provides instant feedback. Users get immediate validation results with detailed reports they can download and use to fix their data before trying again. |
| Constant monitoring required: The central data team must constantly monitor test failures, creating a cycle of context switching and distraction from higher-value work. | Reseed eliminates the need for constant monitoring. Users get instant feedback and can fix issues themselves. The data team isn't constantly triaging failures. |
| Triage and communication overhead: When tests fail, the data team must investigate, communicate with business owners, explain what went wrong, and wait for corrected files. | Reseed eliminates triage overhead. Users see exactly what's wrong and how to fix it immediately. No data team investigation or communication delays required. |
| Iteration delays: After a failure, the business owner must wait for the next scheduled upload job to see if their fix worked. A single data quality issue can take days to resolve. | Reseed enables instant iteration. Users can upload, see results, fix issues, and re-upload in minutes—not days. |
| Script maintenance: Scripts break when passwords change, IP addresses change, file formats evolve, or infrastructure is updated. Someone must maintain and troubleshoot these scripts. | Reseed eliminates script maintenance. No scripts to write, update, or troubleshoot when infrastructure changes. |
| No Excel-specific handling: Multi-worksheet Excel files still need manual splitting, or complex parsing logic must be built into the pipeline. | Reseed handles Excel natively. Multi-worksheet files are handled automatically—users can select specific worksheets or even cell ranges to upload. |
| Security perimeter expansion: Each component (shared drive, script server, cloud storage) expands your security perimeter and requires ongoing maintenance, patching, posture management, and monitoring. | Reseed doesn't expand your security perimeter. Everything runs inside Snowflake's secure environment—no external systems to maintain, patch, or monitor. |
Option 3: How to Upload Excel to Snowflake with Reseed
Quick Summary:
- You want business users to self-serve
- Maintain quality and get instant feedback
- Without needing infrastructure or data team support
- Reseed is there to help you scale, enable your business users, and free up your data and IT teams if you want
Reseed is a Snowflake Native App that lets you upload Excel to Snowflake directly, load Excel into Snowflake with instant validation, and import Excel data into Snowflake with governance and feedback—all without infrastructure, scripts, or delays.
Step-by-Step: How to Import Excel Data into Snowflake Using Reseed
- Install Reseed in Snowflake: Reseed is a Snowflake Native App, so it installs directly in your Snowflake account. No external infrastructure, no cloud storage setup, no scripts to deploy.
- Define Your Data Source: Create a "Seed" in Reseed that defines where Excel files should be uploaded, what validation rules apply, and who has access. You can define rules for required fields, data types, formats, ranges, and custom business logic.
- Upload Excel Files Directly: Users upload Excel files (XLSX, XLS) or Google Sheets directly through Reseed's interface. No CSV conversion required. Multi-worksheet files are handled automatically—users can select specific worksheets or even cell ranges to upload Excel to Snowflake.
- Get Instant Validation: Data is validated immediately at upload against the rules you defined. Users get instant feedback on any issues, with detailed reports they can download and use to fix their data before trying again.
- Data Available Immediately: Valid data is available in Snowflake immediately. No waiting for scheduled jobs, no pipeline delays, no test cycles. When you load Excel into Snowflake with Reseed, you know right away if your data is good.
Why Reseed Makes It Easy to Import Excel to Snowflake
- No CSV conversion: Upload Excel files directly—no need to save as CSV or split multi-worksheet files. Reseed handles Excel natively when you import Excel data into Snowflake.
- Built-in validation: Data quality checks happen at upload with immediate feedback. Users see exactly what's wrong and how to fix it, making it easy to load Excel into Snowflake correctly.
- Automatic CSV conversion: Files are stored as CSV in Snowflake for easy analytics use, but users never need to think about the conversion.
- Schema validation: Ensure uploaded files match expected structure and data types before they enter your Snowflake environment.
- Custom business rules: Define validation rules specific to your data requirements—required fields, data ranges, format checks, and more.
- Role-based access: Control who can upload to which locations using Snowflake's native security model.
- Complete audit trail: Every upload is logged with full event history for compliance and troubleshooting.
- No infrastructure: Everything runs inside Snowflake as a Native App—no expanded security perimeter, no external systems to maintain.
- Immediate availability: Valid data is available in Snowflake right away when you upload Excel to Snowflake with Reseed.
When to Use Reseed for Loading Excel into Snowflake
Reseed is ideal when you want to import Excel data into Snowflake and need to:
- Scale your data uploads: Enable more users to upload Excel to Snowflake without burdening your data team
- Enable business users: Let business analysts and other non-technical users load Excel into Snowflake safely and independently
- Focus your teams on higher-value work: Reduce the time your data and IT teams spend on file uploads, validation, and troubleshooting
- Get instant feedback: Know immediately if data is valid when you import Excel to Snowflake, rather than waiting hours or days
- Avoid infrastructure: Upload Excel to Snowflake without building or maintaining pipelines, scripts, or cloud storage
Reseed
Snowflake Native App
 Try or Buy Reseed